Publish Trivy scan results to Azure DevOps
Continuing my series of posts about container scanning and Azure DevOps, the last of which covered building, scanning and pushing images as a single workflow, let’s take a look at publishing test results straight into Azure DevOps.
Why might you want to do this? It makes the results easier to decipher as part of the runs i.e. you’re not having to dig through log files to see the results. On top of that, it will sit happily along side your other test results in Azure DevOps, providing a single window of truth for tests that run as part of your build making it easier to navigate which might not seem like a lot but it soon adds up!
In a recent release - v0.9.2 - the ability to generate JUnit XML files was added, which is handy as the Azure DevOps Publish Test Results task is compatible with that type of test output!
One thing I’ve found with this that you’ll need to do is add the template for the output to the repo you’re running from in Azure DevOps. Trivy has templates in it’s repository but it doesn’t ship with them. I’ve included a template in my example repository that you can use though.
I usually keep this in a templates folder and the YAML you’ll see for the rest of this post will assume the same.
So let’s start with our Build, Scan and Push pipeline YAML from the previous post. For reference, I’ll include it here too.
trigger:
- master

resources:
- repo: self

variables:
  trivyVersion: 0.9.2
  tag: 'azuredevops-$(Build.BuildNumber)'
  imageName: 'liamgu/container-scanning-demo'

stages:
- stage: Build
  displayName: Build, Scan and Push image
  jobs:
  - job: Build
    displayName: Build, Scan and Push
    pool:
      vmImage: 'ubuntu-latest'
    steps:
    - task: Docker@2
      displayName: Build an image
      inputs:
        containerRegistry: 'Docker hub'
        repository: '$(imageName)'
        command: 'build'
        Dockerfile: '**/Dockerfile'
        buildContext: '$(Build.SourcesDirectory)/src/'
        tags: '$(tag)'

    - script: |
        sudo apt-get install rpm
        wget https://github.com/aquasecurity/trivy/releases/download/v$(trivyVersion)/trivy_$(trivyVersion)_Linux-64bit.deb
        sudo dpkg -i trivy_$(trivyVersion)_Linux-64bit.deb
        trivy -v
      displayName: 'Download and install Trivy'

    - task: CmdLine@2
      displayName: "Run trivy scan"
      inputs:
        script: |
            trivy image --exit-code 0 --severity LOW,MEDIUM $(imageName):$(tag)
            trivy image --exit-code 1 --severity HIGH,CRITICAL $(imageName):$(tag)

    - task: Docker@2
      inputs:
        containerRegistry: 'Docker hub'
        repository: '$(imageName)'
        command: 'push'
        tags: '$(tag)'
This currently outputs test results to the console.

That’s great and well formatted but it’s not quite good enough for my liking. I want it out to Azure DevOps itself and then I can integrate the results with reporting and all sorts.
To achieve this we need to do two things:
- Tell Trivy to output the results in a specific format i.e. JUnit
- Tell Azure DevOps to publish those results
Both of these are pretty trivial to accomplish.
Set Trivy to publish test results to JUnit
All that needs to happen here is we need to add in a handful of arguments to tell Trivy what format we want the results out in, what template to use and what to call the file.
I’ve modified my “Run Trivy Scan” step to look like this:
 - task: CmdLine@2
      displayName: "Run trivy scan"
      inputs:
        script: |
            trivy image --severity LOW,MEDIUM --format template --template "@templates/junit.tpl" -o junit-report-low-med.xml $(imageName):$(tag)
            trivy image --severity HIGH,CRITICAL --format template --template "@templates/junit.tpl" -o junit-report-high-crit.xml $(imageName):$(tag)
Now when the scan runs, two files will be output,junit-report-low-med.xml which contains all our results for low and medium vulnerabilities, and junit-report-high-crit.xml which contains all our results for high and critical vulnerabilities. These are output to the disk of the build agent.
Publish the test results
Before our Docker Push task, we want to publish our test results to Azure DevOps. This is achieved using the Publish Test Results task which you may already be familiar with if you’re doing any kind of testing in Azure DevOps already.
We’re going to go ahead and add the task twice. You could do it in one if you want to and fail the whole build but I want to be a little more granular around it and only fail my build for high and critical vulnerabilities.
    - task: PublishTestResults@2
      inputs:
        testResultsFormat: 'JUnit'
        testResultsFiles: '**/junit-report-low-med.xml'
        mergeTestResults: true
        failTaskOnFailedTests: false
        testRunTitle: 'Trivy - Low and Medium Vulnerabilities'
      condition: 'always()'

    - task: PublishTestResults@2
      inputs:
        testResultsFormat: 'JUnit'
        testResultsFiles: '**/junit-report-high-crit.xml'
        mergeTestResults: true
        failTaskOnFailedTests: true
        testRunTitle: 'Trivy - High and Critical Vulnerabilities'
      condition: 'always()'
There’s a few things to cover here. Firstly, we’re telling each task our report is in a JUnit format and the files we want to publish are called junit-report-low-med.xml and junit-report-high-crit.xml. Secondly, we find our main difference between the two tasks - failTaskOnFailedTests - this pretty much does what it says on the tin. If it’s set to true the task will fail the build if any test failures are found and if it’s set to false, it won’t.
You’ll notice that on each of these tasks there is also something called a condition. This is how in YAML pipelines you can set conditions for running specific tasks. As part of this build we want our test results to be published whether the build failed or succeeded so our condition is always().
Complete YAML
After those changes, our entire pipeline YAML should look like this:
trigger:
- master

resources:
- repo: self

variables:
  trivyVersion: 0.9.2
  tag: 'azuredevops-$(Build.BuildNumber)'
  imageName: 'liamgu/container-scanning-demo'

stages:
- stage: Build
  displayName: Build, Scan and Push image
  jobs:
  - job: Build
    displayName: Build, Scan and Push
    pool:
      vmImage: 'ubuntu-latest'
    steps:
    - task: Docker@2
      displayName: Build an image
      inputs:
        containerRegistry: 'Docker hub'
        repository: '$(imageName)'
        command: 'build'
        Dockerfile: '**/Dockerfile'
        buildContext: '$(Build.SourcesDirectory)/src/'
        tags: '$(tag)'

    - script: |
        sudo apt-get install rpm
        wget https://github.com/aquasecurity/trivy/releases/download/v$(trivyVersion)/trivy_$(trivyVersion)_Linux-64bit.deb
        sudo dpkg -i trivy_$(trivyVersion)_Linux-64bit.deb
        trivy -v
      displayName: 'Download and install Trivy'

    - task: CmdLine@2
      displayName: "Run trivy scan"
      inputs:
        script: |
            trivy image --severity LOW,MEDIUM --format template --template "@templates/junit.tpl" -o junit-report-low-med.xml $(imageName):$(tag)
            trivy image --severity HIGH,CRITICAL --format template --template "@templates/junit.tpl" -o junit-report-high-crit.xml $(imageName):$(tag)

    - task: PublishTestResults@2
      inputs:
        testResultsFormat: 'JUnit'
        testResultsFiles: '**/junit-report-low-med.xml'
        mergeTestResults: true
        failTaskOnFailedTests: false
        testRunTitle: 'Trivy - Low and Medium Vulnerabilities'
      condition: 'always()'

    - task: PublishTestResults@2
      inputs:
        testResultsFormat: 'JUnit'
        testResultsFiles: '**/junit-report-high-crit.xml'
        mergeTestResults: true
        failTaskOnFailedTests: true
        testRunTitle: 'Trivy - High and Critical Vulnerabilities'
      condition: 'always()'

    - task: Docker@2
      inputs:
        containerRegistry: 'Docker hub'
        repository: '$(imageName)'
        command: 'push'
        tags: '$(tag)'
The result
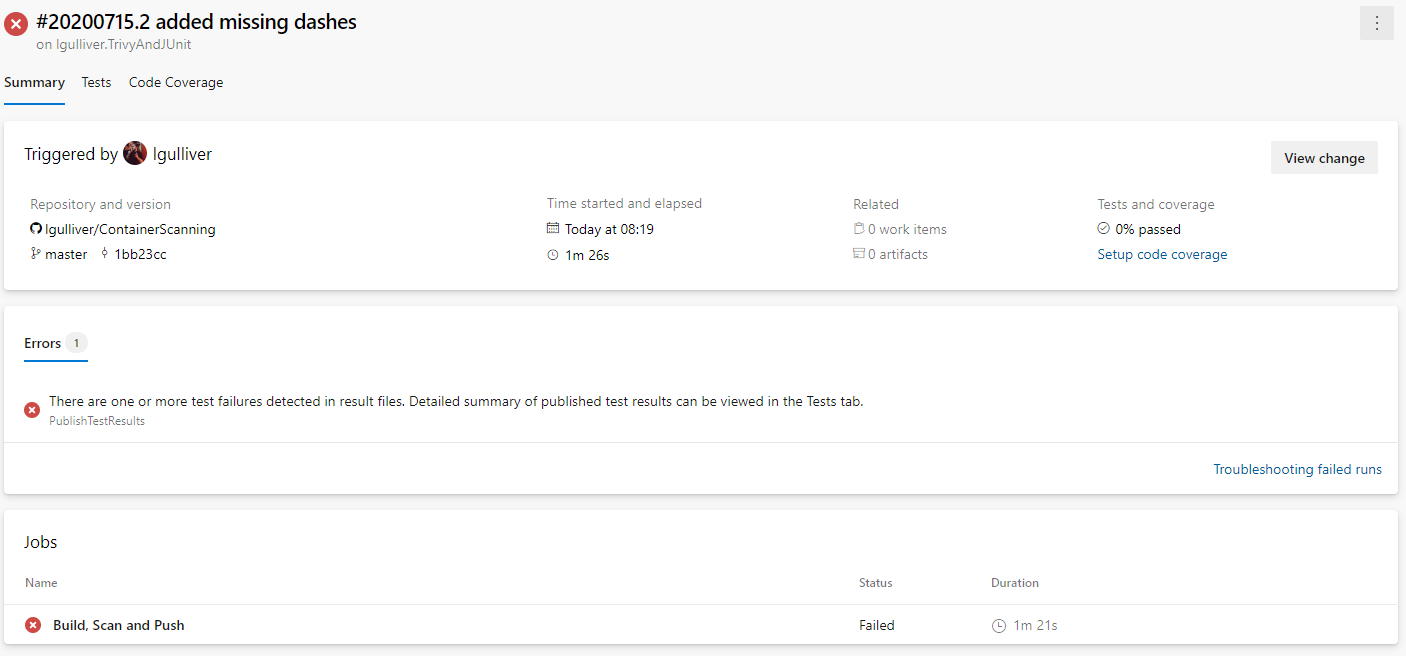
When the pipeline is run now, our summary for our build should show the build as failed and now look a little something like this:

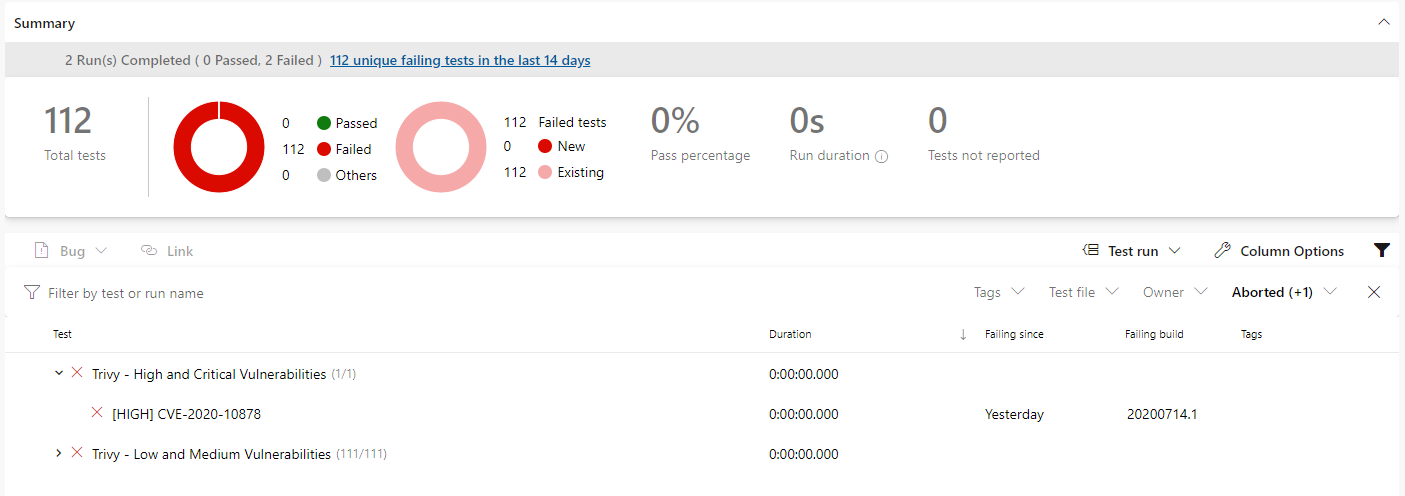
If you click the percentage passed under Tests and coverage you’ll be taken to the test results screen where you will see two test runs.

And that’s it! You’ve now got a build that is building your application in a Docker image, scanning the image, outputting the test results to Azure DevOps and if all is successful, pushing that image to a Docker registry.
For all the code included in this post, you can get copies of it over at my ContainerScanning Github repository.

Leave a comment