
Build, Scan and Push containers with Azure DevOps, GitHub and Trivy
Building upon my previous posts regarding Trivy with Azure DevOps and Github where we scanned pre-built images, I thought we should approach it from a “real-world” perspective, or at least how I use Trivy.
You’re probably thinking “why weren’t the other two posts real-world?” well, the truth is they absolutely are. You could trigger an action to scan a pre-built image for a whole host of different reasons and in reality, what I’m about to describe in this post isn’t really any different. The only difference really is that before I push my container image to any registry, I’m going to scan the locally (to the build agent) built image.
My opinion is that the order of things should be as follows:
- Build the Docker image
- Scan with Trivy
- If it succeeds, push it to Docker Hub
- If it fails, fail the build
Why? We should build the application, run unit tests and build the image. Then we should scan the image, but if there’s a severe vulnerability we should stop that flawed image from being pushed to the registry and having those vulnerabilities making their way to production.
I’ve also put everything included in this post in a Github repository. I’m using the generic ASP.NET Core MVC start project you get when you run dotnet new mvc and I’ve added Docker support with the Dockerfile that gets created by Visual Studio too. The Dockerfile is included below:
#See https://aka.ms/containerfastmode to understand how Visual Studio uses this Dockerfile to build your images for faster debugging.

FROM mcr.microsoft.com/dotnet/core/aspnet:3.1-buster-slim AS base
WORKDIR /app
EXPOSE 80
EXPOSE 443

FROM mcr.microsoft.com/dotnet/core/sdk:3.1-buster AS build
WORKDIR /src
COPY ["ContainerScanning.HelloWorld/ContainerScanning.HelloWorld.csproj", "ContainerScanning.HelloWorld/"]
RUN dotnet restore "ContainerScanning.HelloWorld/ContainerScanning.HelloWorld.csproj"
COPY . .
WORKDIR "/src/ContainerScanning.HelloWorld"
RUN dotnet build "ContainerScanning.HelloWorld.csproj" -c Release -o /app/build

FROM build AS publish
RUN dotnet publish "ContainerScanning.HelloWorld.csproj" -c Release -o /app/publish

FROM base AS final
WORKDIR /app
COPY --from=publish /app/publish .
ENTRYPOINT ["dotnet", "ContainerScanning.HelloWorld.dll"]
Rather than covering it in two near identical posts, I’m going to cover both Azure DevOps and Github here too. I’ll also assume you already have a repository or at least know how to create one in Azure DevOps and Github.
Building a Docker image, scanning it with Trivy and pushing it to Docker Hub in Azure DevOps and Github
Setting up the basics
Azure DevOps
We’re going to need to create a service connection to Docker Hub (or a registry of your choice). To do this in Azure DevOps go to Project settings > Service connections > New service connection > Docker registry and hit the next button.
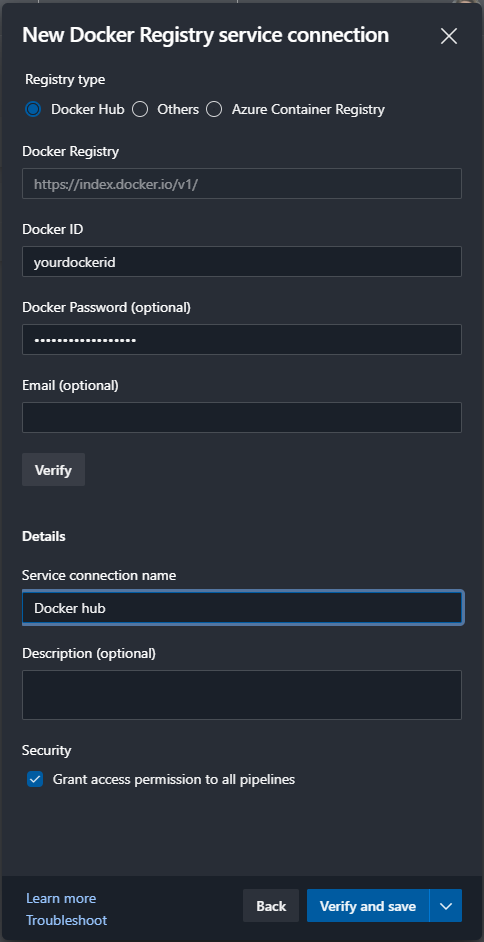
Set the same settings as above and your user name and password, then click the verify and save button.
Github
For Github, the action defaults to Docker hub already - we just need to provide credentials. You can do this by setting up secrets that we’ll use later. In your repository, click on Settings > Secrets and create a new secret for your user name and password.

Creating the build YAML
Next, create a new build yaml file.
Let’s setup a few variables to get us going. I like to tag my images with the build number and not the build ID so that its easier to trace at a glance through the pipeline. As an aside, I’m including azuredevops- and in the actions version github- because on a successful push to the registry, I want to see which tool the image has come from for my demos.
While we’re at it, let’s go ahead and name the image too with <repo>/<imagename>.
Azure DevOps
trigger:
- master

resources:
- repo: self

variables:
  trivyVersion: 0.9.1
  tag: 'azuredevops-$(Build.BuildNumber)'
  imageName: 'liamgu/container-scanning-demo'
A quick reminder of what we have here:
- We’ve set the CI trigger to run from commits to
master - Specified we need the repo the yaml is in
- Set our tag and image name
- Set our Trivy version, image tag and image name
Github
name: Build-Scan-Push

# Controls when the action will run. Triggers the workflow on push or pull request
# events but only for the master branch
on:
  push:
    branches: [ master ]
  pull_request:
    branches: [ master ]

env:
  BuildNumber: ${{ github.run_id }}-${{ github.run_number }}
  ImageName: 'liamgu/container-scanning-demo'

jobs:
  # This workflow contains a single job called "build"
  build:
    # The type of runner that the job will run on
    runs-on: ubuntu-latest

    # Steps represent a sequence of tasks that will be executed as part of the job
    steps:
    # Checks-out your repository under $GITHUB_WORKSPACE, so your job can access it
    - uses: actions/checkout@v2
With Github Actions we’ve done the following to get started:
- Set CI triggers to run off of commits to
master - Set a build number as an environment variable. We’ll also use this as our tag
- Set our image name
- Added the action to checkout the repo
Build the Docker image
Now let’s go ahead and add in the stage, pool and task to build the image.
Azure DevOps
stages:
- stage: Build
  displayName: Build, Scan and Push image
  jobs:
  - job: Build
    displayName: Build, Scan and Push
    pool:
      vmImage: 'ubuntu-latest'
    steps:
    - task: Docker@2
      displayName: Build an image
      inputs:
        containerRegistry: 'Docker hub' #the name of the service connection
        repository: '$(imageName)'
        command: 'build'
        Dockerfile: '**/Dockerfile'
        buildContext: '$(Build.SourcesDirectory)/src/'
        tags: '$(tag)'
One important thing here is that we set the build context for the docker build command. This will set the context of where all the actions for building the dockerfile will run from. The above is set up for running my demo project. It will only build and tag the image at this stage. We’re also accessing our variables with $(<variable name>).
Github
    - name: Build Docker image
      uses: docker/build-push-action@v1.1.0
      with:
        # Username used to log in to a Docker registry. If not set then no login will occur
        username: ${{ secrets.DockerHubUser }}
        # Password or personal access token used to log in to a Docker registry. If not set then no login will occur
        password: ${{ secrets.DockerHubPassword }}
        # Docker repository to tag the image with
        repository: ${{ env.ImageName }}
        # Comma-delimited list of tags. These will be added to the registry/repository to form the image's tags
        tags: 'github-${{ env.BuildNumber }}'
        # Path to the build context
        path: 'src'
        # Path to the Dockerfile (Default is '{path}/Dockerfile')
        dockerfile: 'src/ContainerScanning.HelloWorld/Dockerfile'
        # Whether to push the image
        push: false
This use the Docker Build and Push action by Docker themselves.
It looks a lot different to the Azure DevOps flavour of the task though ultimately it does the same thing. Personally I feel the Azure DevOps flavour is cleaner but I’m not sure it matters as they work the same way pretty much.
Here, we’re also setting the build context, but via path instead. We’re also accessing our secrets and environment variables with ${{ <secret or env>.<Name> }}.
It pushes by default so for this, let’s set push to false.
Run the Trivy Scan
Now let’s go ahead and add in the Trivy steps with a couple of changes.
Azure DevOps
    - script: |
        sudo apt-get install rpm
        wget https://github.com/aquasecurity/trivy/releases/download/v$(trivyVersion)/trivy_$(trivyVersion)_Linux-64bit.deb
        sudo dpkg -i trivy_$(trivyVersion)_Linux-64bit.deb
        trivy -v
      displayName: 'Download and install Trivy'

    - task: CmdLine@2
      displayName: "Run trivy scan"
      inputs:
        script: |
            trivy image --exit-code 0 --severity LOW,MEDIUM $(imageName):$(tag)
            trivy image --exit-code 1 --severity HIGH,CRITICAL $(imageName):$(tag)
For the most part, they’re the same as my previous post with only one minor change to make it use the image that has just been built and that’s to change the image used to our variables from earlier. Using $(imageName):$(tag) will first look on disk before going out to Docker hub.
Github
    - name: Trivy Scan - Unknown, Low and Medium Severity
      uses: aquasecurity/trivy-action@0.0.7
      with:
        # image reference
        image-ref: ${{ env.ImageName }}:github-${{ env.BuildNumber }}
        # exit code when vulnerabilities were found
        exit-code: 0
        # severities of vulnerabilities to be displayed
        severity: UNKNOWN,LOW,MEDIUM

    - name: Trivy Scan - High and Critical Severity
      uses: aquasecurity/trivy-action@0.0.7
      with:
        # image reference
        image-ref: ${{ env.ImageName }}:github-${{ env.BuildNumber }}
        # exit code when vulnerabilities were found
        exit-code: 1
        # severities of vulnerabilities to be displayed
        severity: HIGH,CRITICAL
To run with different filters, just like we do with Azure DevOps we need to run the command twice and set the severity filters and exit code for each. Just like with Azure DevOps and in fact, locally, it’ll look on disk first before going to Docker hub.
In this setup for both Azure DevOps and Github, if there are any vulnerabilities found that are classified as high or above we’ll fail the build.
When all is well, push to Docker hub
If we get this far, we’ve not found any vulnerabilities to stop the build - though there’s an argument to suggest that we should break the build for medium and higher vulnerabilities.
For this though, we’ll be happy with high and above still so let’s add in the task/action to push to Docker hub.
Azure DevOps
    - task: Docker@2
      inputs:
        containerRegistry: 'Docker hub'
        repository: '$(imageName)'
        command: 'push'
        tags: '$(tag)'
Here we’re just using the same Docker task and setting the command to push. We don’t need to build it again and just push the image up from on disk.
Github
The Github flavour of this action is the same action again which can be misleading because it looks like it will build the image once again.
    - name: Push Docker image
      uses: docker/build-push-action@v1.1.0
      with:
        # Username used to log in to a Docker registry. If not set then no login will occur
        username: ${{ secrets.DockerHubUser }}
        # Password or personal access token used to log in to a Docker registry. If not set then no login will occur
        password: ${{ secrets.DockerHubPassword }}
        # Docker repository to tag the image with
        repository: ${{ env.ImageName }}
        # Comma-delimited list of tags. These will be added to the registry/repository to form the image's tags
        tags: 'github-${{ env.BuildNumber }}'
        # Path to the build context
        path: 'src'
        # Path to the Dockerfile (Default is '{path}/Dockerfile')
        dockerfile: 'src/ContainerScanning.HelloWorld/Dockerfile'
        # Whether to push the image
        push: true
In fact, it is so misleading because the only difference between the build and push steps is push: true however, it doesn’t build the image twice - you can see a complete example of that at https://github.com/lgulliver/ContainerScanning/runs/859762381?check_suite_focus=true which is from when I was testing the Docker build and push actions before adding Trivy into the mix.
Done!
That’s it. Commit your respective YAML files and build away!
Leave a comment