
Serverless Chat with Blazor WebAssembly in Azure
It has been quite a long time since I’ve done much in terms of writing any code for myself but Blazor WebAssembly has piqued my interest.
The last time I touched any front-end development at all, Bootstrap 3 was all the rage and well, frankly, I never bothered with the n number of javascript frameworks there are because I’m not keen on writing javascript. Things like typescript just haven’t worked their way far enough up my to do list, but the ability for me to write everything in C# and have it run in my browser? Yes please.
This post covers my little proof-of-concept chat application I wrote to work out how to build a Blazor WebAssembly client with serverless resources in Azure.
For this PoC, I’ve set myself the following constraints:
- Front end must be a static site so I can host it in Azure Storage
- I want to use Azure Functions for any server-side logic
- I don’t want to use Blazor Server
In terms of resources, this is what I’m using:
Azure SignalR Service
Azure SignalR Service is an Azure hosted and managed flavour of SignalR. What that means is that you don’t need to manage scaling of the service, availability of the service and it’s cheaper than doing either of those things yourself.
Azure Functions
An Azure Function is a serverless compute service that allows you to create event-driven, scalable apps in dotnetcore, Python, Node.js, Java or even PowerShell.
For this project, we’re sticking with dotnetcore.
Blazor WebAssembly
Blazor WebAssembly lets you write progressive web application UIs in C# instead of JavaScript. Some nifty stuff!
I’m not going to go into how SignalR works and so on in the context of this post, but there’s plenty of resources around on SignalR and Azure SignalR that you can look up.
Pre-requistes
If you’re following along at home, you’ll need at least the following:
- An Azure subscription - you can get started with a free subscription that gives you $200 of credit for 30 days and 12 months of popular free services https://azure.microsoft.com/en-us/free/
- A minimum of DotNetCore 3.1.300 SDK
- Visual Studio Code
- NPM and Azure Functions Runtime
- Install C# support in Visual Studio Code
- Install the Azure Functions Extension for VSCode (note: you may also need the Azure extension)
To install the Azure Functions Runtime, open up a terminal window (I use a beautified version of the new Windows Terminal) and run the below:
npm i -g azure-functions-core-tools --unsafe-perm true
Project Prep
Make your project folder
mkdir BlazorServerlessChat
Open VSCode
code .
Create your Blazor WebAssembly project
Open up your terminal in VSCode and type the below:
dotnet new blazorwasm -o ServerlessChat.Client
This will create a new Blazor WebAssembly project for you. You will get a message about adding missing dependencies for debugging in VSCode and VSCode wanting to resolve them. Say yes!
Once you’ve done that, hit F5 and open a browser. Head on over tp https://localhost:5001.
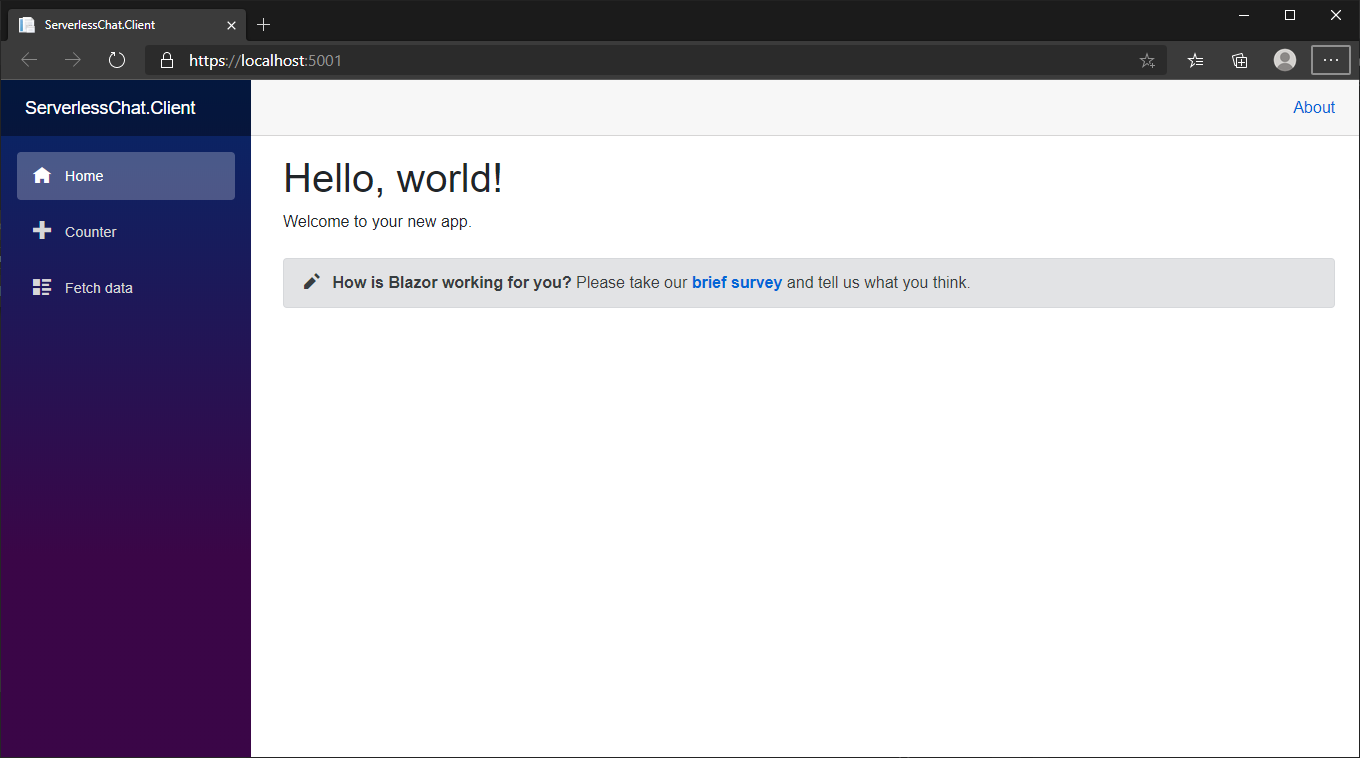
Stop debugging once you see this.
Install the SignalR NuGet package into your project
In your terminal window again, switch directory to your ServerlessChat.Client project folder.
cd .\ServerlessChat.Client\
Add the Microsoft.AspNetCore.SignalR.Client package to the project with the below command.
dotnet add package Microsoft.AspNetCore.SignalR.Client --version 3.1.4
Great, now we have everything we need in your client to start communicating with SignalR!
Build your Pages/Index.razor
Open up Index.razor in the Pages directory of your ServerlessChat.Client project.
It should currently look something like this:
@page "/"

<h1>Hello, world!</h1>

Welcome to your new app.

<SurveyPrompt Title="How is Blazor working for you?" />
Remove all lines of code after @page "/" in the file.
Now, the first thing we need to do is add a using statement for the package we added earlier into the page. This can be done with adding the below on a new line after @page "/".
@page "/"

@using Microsoft.AspNetCore.SignalR.Client
Let’s also build out the UI for this page. On a new line after the using statement, add the following:
<h1>@hubConnection.State</h1>

<div class="form-group">
    <label>
        User:
        <input @bind="userInput" />
    </label>
</div>
<div class="form-group">
    <label>
        Message:
        <input @bind="messageInput" size="50" />
    </label>
</div>
<button @onclick="SendAsync" disabled="@(!IsConnected)">Send</button>

<hr>

<ul id="messagesList">
    @foreach (var message in messages)
    {
        <li>@message.Name: @message.Message</li>
    }
</ul>
This is adding two textboxes - one for a username and one for a message, along with a button and an area where our messages will appear.
Next, let’s add our code to wire everything up. On a new line after the HTML just added, we’re going to add some methods in C#.
This is done by creating a @code block in the .razor file. The snippet below contains comments for what each section is doing
@code {
    private HubConnection hubConnection; //for connecting to SignalR
    private List<ClientMessage> messages = new List<ClientMessage>(); //List of messages to display
    private string userInput; //username
    private string messageInput; //message
    private readonly HttpClient _httpClient = new HttpClient(); //HttpClient for posting messages

    private readonly string functionAppBaseUri = "http://localhost:7071/api/"; //URL for function app. Leave this as is for now.

    protected override async Task OnInitializedAsync() //actions to do when the page is initialized
    {
        //create a hub connection to the function app as we'll go via the function for everything SignalR.
        hubConnection = new HubConnectionBuilder()
            .WithUrl(functionAppBaseUri)
            .Build();

        //Registers handler that will be invoked when the hub method with the specified method name is invoked.
        hubConnection.On<ClientMessage>("clientMessage", (clientMessage) =>
        {
            messages.Add(clientMessage);
            StateHasChanged(); //This tells Blazor that the UI needs to be updated
        });

        await hubConnection.StartAsync(); //start connection!
    }

    //send our message to the function app
    async Task SendAsync() {

        var msg = new ClientMessage
        {
            Name = userInput,
            Message = messageInput
        };

        await _httpClient.PostAsJsonAsync($"{functionAppBaseUri}messages", msg); // post to the function app
        messageInput = string.Empty; // clear the message from the textbox
        StateHasChanged(); //update the UI
    }

    //Check we're connected
    public bool IsConnected =>
        hubConnection.State == HubConnectionState.Connected;

    public class ClientMessage
    {
        public string Name { get; set; }
        public string Message { get; set; }
    }
}
Add the above snippet to the Index.razor page.
Putting it all together should look like this:
@page "/"

@using Microsoft.AspNetCore.SignalR.Client

<h1>@hubConnection.State</h1>

<div class="form-group">
    <label>
        User:
        <input @bind="userInput" />
    </label>
</div>
<div class="form-group">
    <label>
        Message:
        <input @bind="messageInput" size="50" />
    </label>
</div>
<button @onclick="SendAsync" disabled="@(!IsConnected)">Send</button>

<ul id="messagesList">
    @foreach (var message in messages)
    {
        <li>@message.Name: @message.Message</li>
    }
</ul>

@code {
    private HubConnection hubConnection; //for connecting to SignalR
    private List<ClientMessage> messages = new List<ClientMessage>(); //List of messages to display
    private string userInput; //username
    private string messageInput; //message
    private readonly HttpClient _httpClient = new HttpClient(); //HttpClient for posting messages

    private readonly string functionAppBaseUri = "http://localhost:7071/api/"; //URL for function app. Leave this as is for now.

    protected override async Task OnInitializedAsync() //actions to do when the page is initialized
    {
        //create a hub connection to the function app as we'll go via the function for everything SignalR.
        hubConnection = new HubConnectionBuilder()
            .WithUrl(functionAppBaseUri)
            .Build();

        //Registers handler that will be invoked when the hub method with the specified method name is invoked.
        hubConnection.On<ClientMessage>("clientMessage", (clientMessage) =>
        {
            messages.Add(clientMessage);
            StateHasChanged(); //This tells Blazor that the UI needs to be updated
        });

        await hubConnection.StartAsync(); //start connection!
    }

    //send our message to the function app
    async Task SendAsync() {

        var msg = new ClientMessage
        {
            Name = userInput,
            Message = messageInput
        };

        await _httpClient.PostAsJsonAsync($"{functionAppBaseUri}messages", msg); // post to the function app
        messageInput = string.Empty; // clear the message from the textbox
        StateHasChanged(); //update the UI
    }

    //Check we're connected
    public bool IsConnected =>
        hubConnection.State == HubConnectionState.Connected;

    public class ClientMessage
    {
        public string Name { get; set; }
        public string Message { get; set; }
    }
}
Create a new SignalR Service in Azure
Go to https://portal.azure.com and click on Create a Resource.

Find the SignalR Service resource and click on create.
Make sure you select the correct subscription if you have more than one!
Fill out the rest of the form as you see fit, however, ensure that you select Free (Dev/Test Only) for pricing tier and Serverless for ServiceMode.
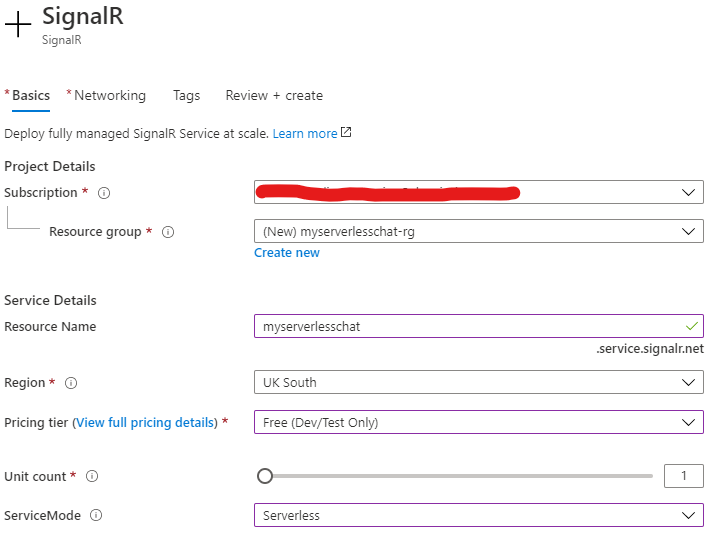
Once you’re done, hit the Review + Create button, then the create button. This will deploy your new service into the resource group you specified.
When the deployment is complete, go to your service and select Keys and find your primary connection string.
You’ll find something like this that you shoud make note of for the next section:
Endpoint=https://<nameofyourservice>.service.signalr.net;AccessKey=SomeAccessKeyABCDEF123456;Version=1.0;
Create a new Function Project in Visual Studio Code
Create a new directory at the root of your BlazorServerlessChat folder. Let’s call it ServerlessChat.Function. You can do this either in the Visual Studio Code Explorer or through the terminal.
Once you’ve done that, hit Ctrl + Shift + A to open your Azure Functions Extension.
Click the Create New Project button from the Azure Functions bar at the top of the pane.

A new command window will open up at the top of the screen. Find the folder you just created.
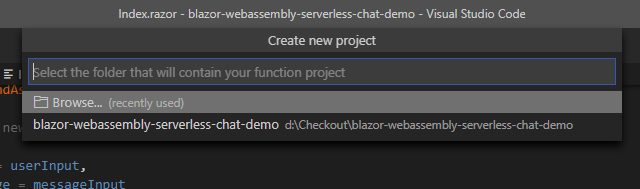
This will be where the new project is created.
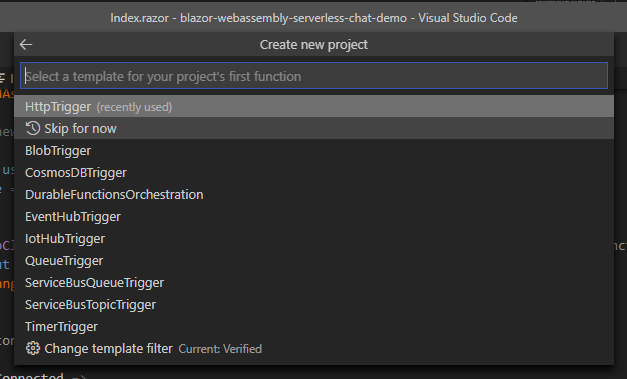
Once selected, you’ll be asked to set what runtime you want to use. Select C#.
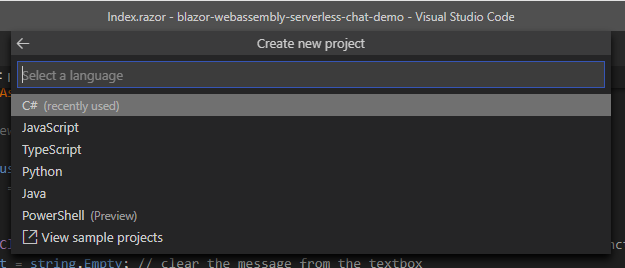
You’ll then be asked about creating your first trigger. Select Skip for now.
Open local.settings.json and replace it with the following, ensuring your connection string is added to it as well.
{
  "IsEncrypted": false,
  "Values": {
    "AzureWebJobsStorage": "",
    "FUNCTIONS_WORKER_RUNTIME": "dotnet",
    "AzureSignalRConnectionString": "<YOUR CONNECTION STRING>"
  },
  "Host": {
    "LocalHttpPort": 7071,
    "CORS": "*",
    "CORSCredentials": false
  }
}
You will need to add the NuGet Package Microsoft.Azure.WebJobs.Extensions.SignalRService to the Function App project.
dotnet add package Microsoft.Azure.WebJobs.Extensions.SignalRService --version 1.1.0
Next, create a Functions.cs file at the root of your Function App project.
using System;
using System.IO;
using System.Threading.Tasks;
using Microsoft.AspNetCore.Mvc;
using Microsoft.Azure.WebJobs;
using Microsoft.Azure.WebJobs.Extensions.Http;
using Microsoft.Azure.WebJobs.Extensions.SignalRService;
using Microsoft.AspNetCore.Http;
using Microsoft.Extensions.Logging;
using Newtonsoft.Json;

namespace ServerlessChat.Functions
{
    public static class Functions
    {
        // This will manage connections to SignalR
        [FunctionName("negotiate")]
        public static SignalRConnectionInfo GetSignalRInfo(
            [HttpTrigger(AuthorizationLevel.Anonymous, "post")] HttpRequest req,
            [SignalRConnectionInfo(HubName = "chatHub")] SignalRConnectionInfo connectionInfo)
        {
            return connectionInfo;
        }

        //Send the messages!
        [FunctionName("messages")]
        public static Task SendMessage(
            [HttpTrigger(AuthorizationLevel.Anonymous, "post")] ClientMessage clientMessage,
            [SignalR(HubName = "chatHub")] IAsyncCollector<SignalRMessage> signalRMessages)
        {
            return signalRMessages.AddAsync(
                new SignalRMessage
                {
                    Target = "clientMessage",
                    Arguments = new[] { clientMessage }
                });
        }
    }

    public class ClientMessage
    {
        public string Name { get; set; }
        public string Message { get; set; }
    }
}
Start the function app and Blazor
Start the function app
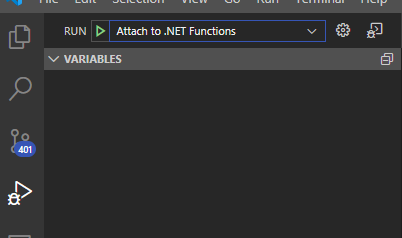
Select the Run pane and then select Attach to .NET Functions then click the green arrow.
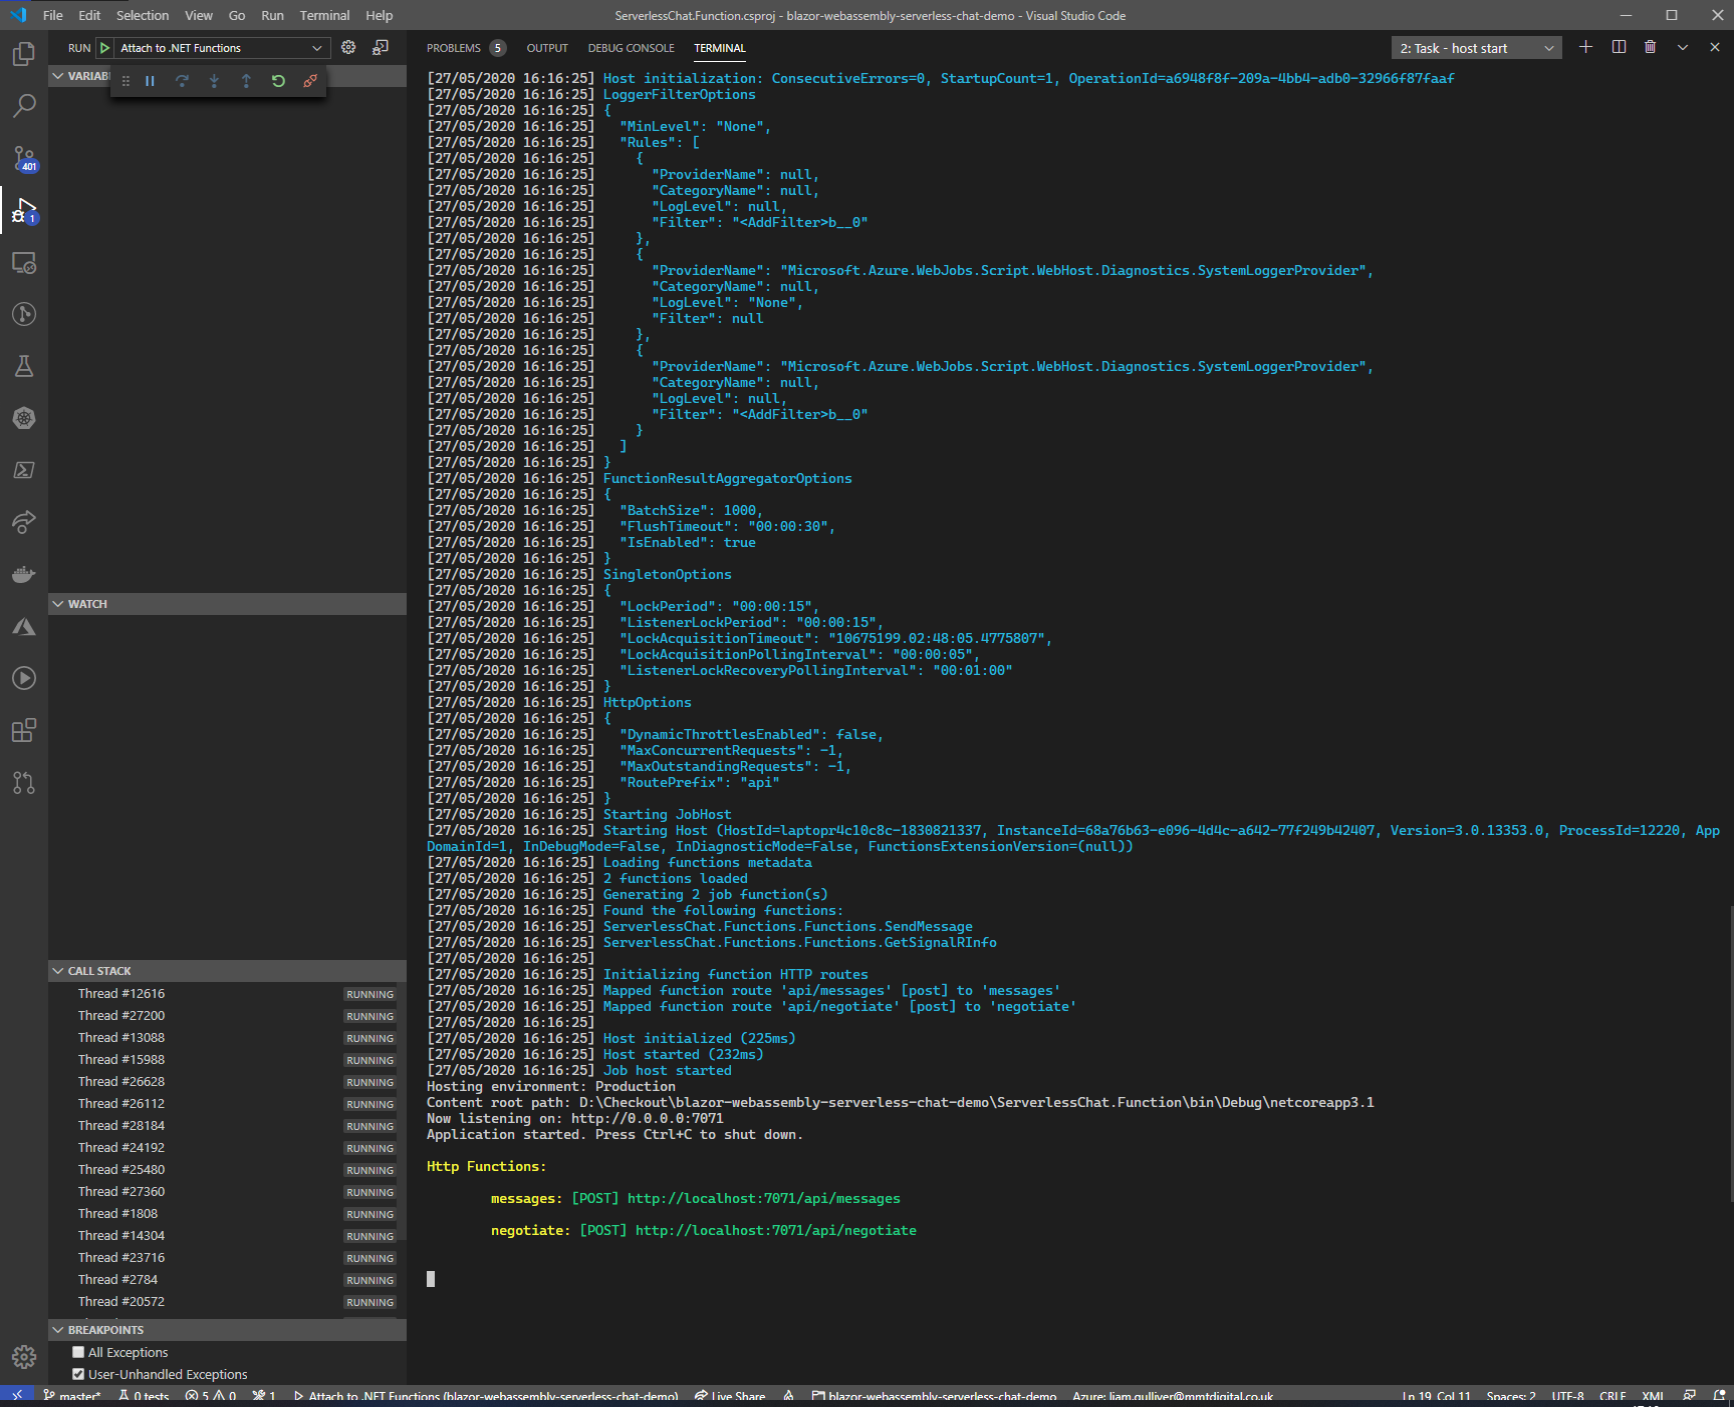
This will run the Azure Functions Emulator on your local machine.
A successfully running local function will produce output similar to this:
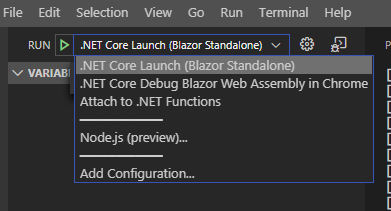
With the function app still running, select .NET Core Launch (Blazor Standalone) and click the green arrow.
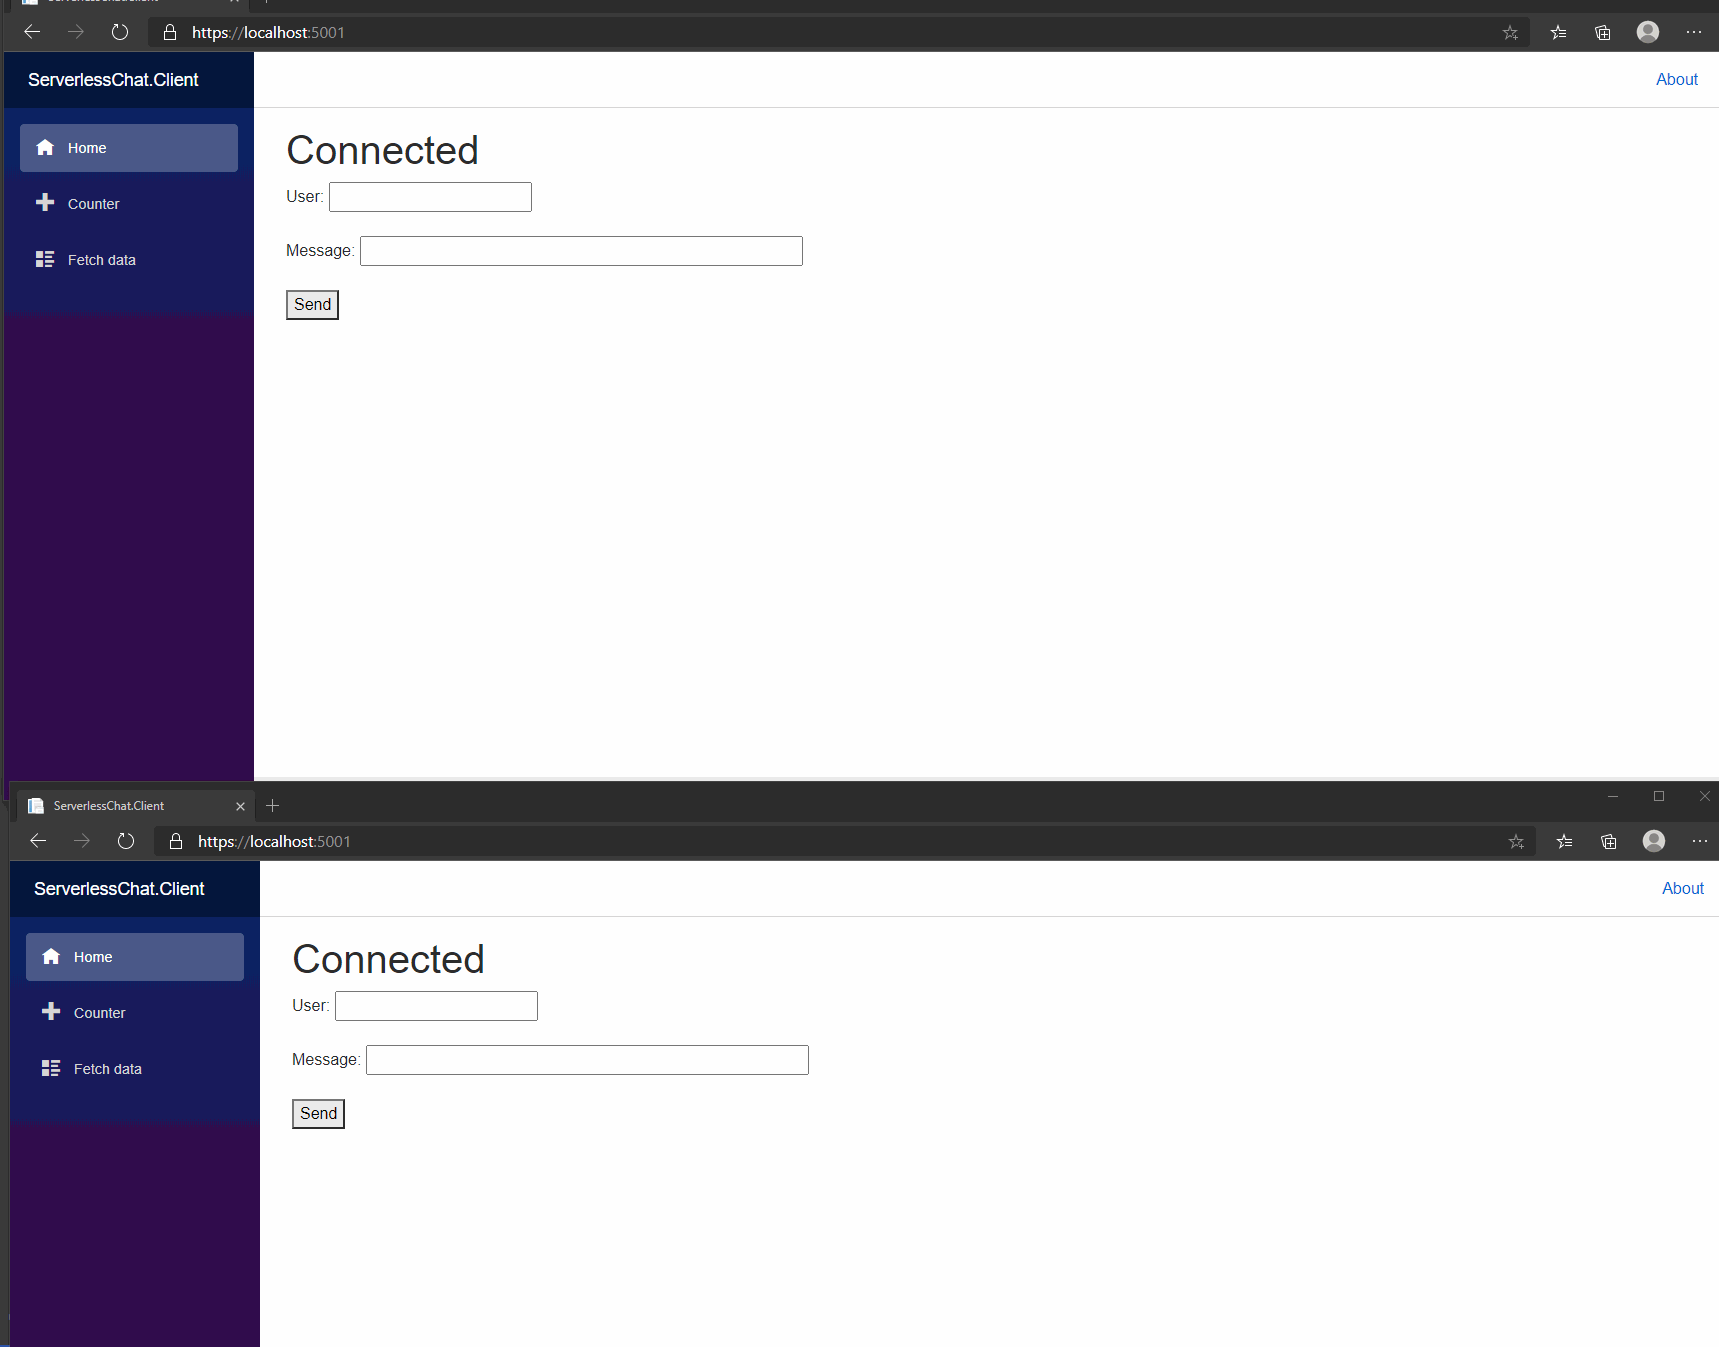
Once both are running, open two tabs (or more!) of https://localhost:5001.
When open, if they’re communicating with the function app running locally, which is also connected to your Azure SignalR service, you should see them both say Connected.
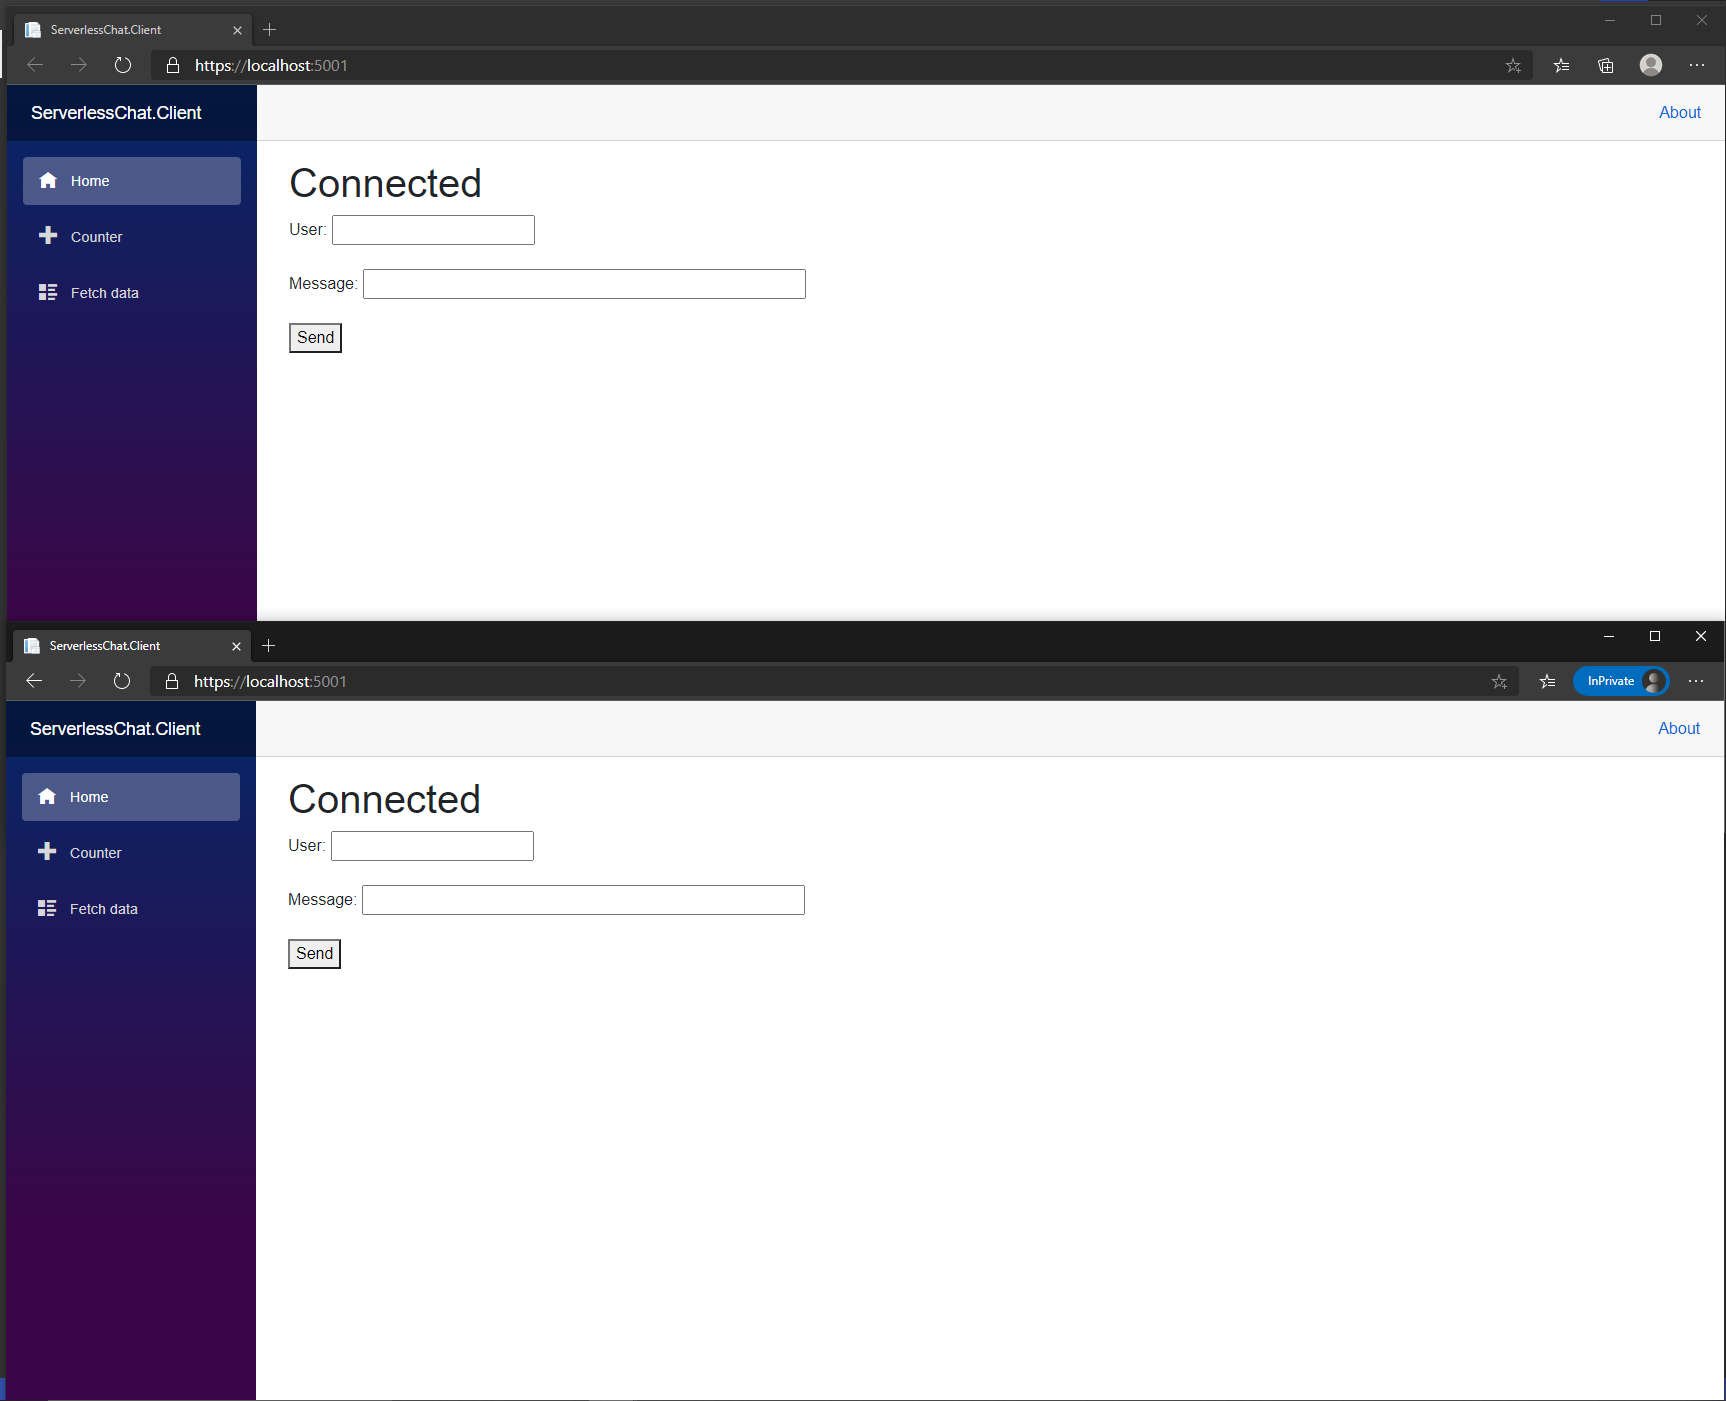
Go ahead and enter a name and a message in each window and you should see your chat messages appear!
End Result
Deploying it all into Azure is as easy as updating your config to point to the right function application and copying your Blazor build output to a storage account with static website hosting enabled. You can read mor on that over on the Microsoft documentation.
Complete Code
You can find the complete code for this over at lgulliver/blazor-webassembly-serverless-chat-demo
Leave a comment